티스토리 뷰
Today, let's take a look at ProRAW provided by iPhone12Pro.
http://austinmann.com/trek/iphone-proraw
ProRAW on iphone 12 pro
Austin Mann
Apple이 사진 전문가 (Creative professional)크리에이티브 전문가를위한 새로운 이미지 형식인 Apple ProRAW를 공식적으로 출시했습니다. 이것은 iPhone의 디지털 이미징 분야에서 기념비적인 도약을 의미하고 이에 대해 조금 더 말씀드리겠습니다. - 늘 그렇지만 멘트가 참 거창합니다.
Apple has officially launched Apple ProRAW, a new image format for creative professionals. This represents a landmark leap forward in the iPhone's digital imaging field, and I'll tell you a little more about it. -As always, the comments are great.
ProRAW가 중요한 이유, ProRAW 촬영 방법, iPhone ProRAW 워크 플로우를위한 최고의 도구와 앱에 대해 설명하겠습니다.
We'll explain why ProRAW matters, how to shoot ProRAW, and the best tools and apps for your iPhone ProRAW workflow.
ProRAW가 무엇이고, 왜 중요한가 - What is ProRAW and why is it important
전문 사진 작가는 더 많이 부분을 조절(수정)할 수 있다는 이유로 전통적으로 RAW로 촬영을 선택합니다. 더 많은 데이터 (더 많은 색상, 더 많은 Range(범위))가 있는 경우 더 많은 관용도가 있으며 이제 ProRAW를 사용하면 기본 iPhone 카메라 앱에 이 고급 기능이 내장되어 있습니다.
Professional photographers traditionally choose to shoot in RAW because they have more control (correction) of parts. If you have more data (more colors, more Range), there is more latitude, and now with ProRAW, you have this advanced feature built into the native iPhone camera app.
작가는 이 글을 통해 iPhone에서 Apple의 RAW 형식을 볼 것이라고는 생각하지 못했다고 합니다. iPhone 사진의 계산적 측면이 얼마나 중요한지 이해하고 그 계산 능력을 활용하고 여전히 제어할 수있는 세상을 상상하지 못했기 때문입니다.
The author said that this article did not think he would see Apple's RAW format on the iPhone. It's because I haven't imagined a world where I can understand how important the computational aspect of iPhone photos is and utilize that computational power and still have control over it.
ProRAW를 사용하면 iPhone 카메라는 정확한 이미징에 절대적으로 필요한 계산만 활용하지만 화이트 밸런스, 노이즈 감소, 선명화 등과 같은 기본 설정 매개 변수를 완벽하게 제어 할 수 있습니다
With ProRAW, the iPhone camera utilizes only the calculations absolutely necessary for accurate imaging, but gives you full control over preference parameters such as white balance, noise reduction, sharpening, etc.
나이트모드+ProRAW로 별사진 촬영
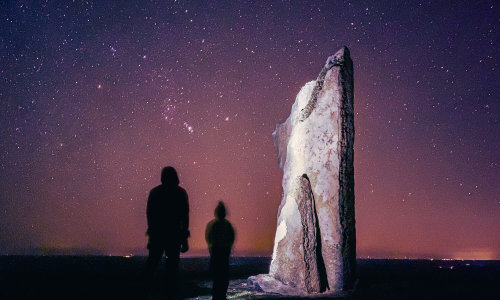
iPhone 12 Pro Max로 ProRAW를 통해 Geminid 유성우를 촬영하였는데, 작가는 라이트 페인팅 (장시간 노출 촬영 및 손전등을 사용하여 장면 페인팅)을 좋아하는데, 야간 모드 + ProRAW를 사용해서 라이트페인팅 사진 촬영을 쉽고, 잘 찍을 수 있다고 합니다.
I photographed Geminid meteor shower through ProRAW with iPhone 12 Pro Max, and the artist likes light painting (long exposure shooting and scene painting using a flashlight), but using night mode + ProRAW, it is easy to take lightpainting photos. I can say that.
다음은 ProRAW의 iPhone 12 Pro Max에서 촬영 한 30 초 야간 모드 노출입니다. 손전등을 사용하여 장시간 노출되는 동안 바위에 빛을 표현했습니다.
Here's a 30-second night mode exposure shot on ProRAW's iPhone 12 Pro Max. I used a flashlight to express light on the rocks during prolonged exposure.

여기에서 비교해보면, 아래 두 이미지는 모두 Lightroom에서 처리하였는데, 바위와 하늘의 극적인 차이를 확인할 수 있습니다. (노이즈 감소 알고리즘에 의해 지워지지 않았기 때문에 ProRAW 이미지에서 훨씬 더 많은 별을 볼 수 있습니다.)
In comparison here, both images below were processed in Lightroom, and you can see the dramatic difference between the rocks and the sky. (Much more stars can be seen in the ProRAW image as they have not been erased by the noise reduction algorithm.)
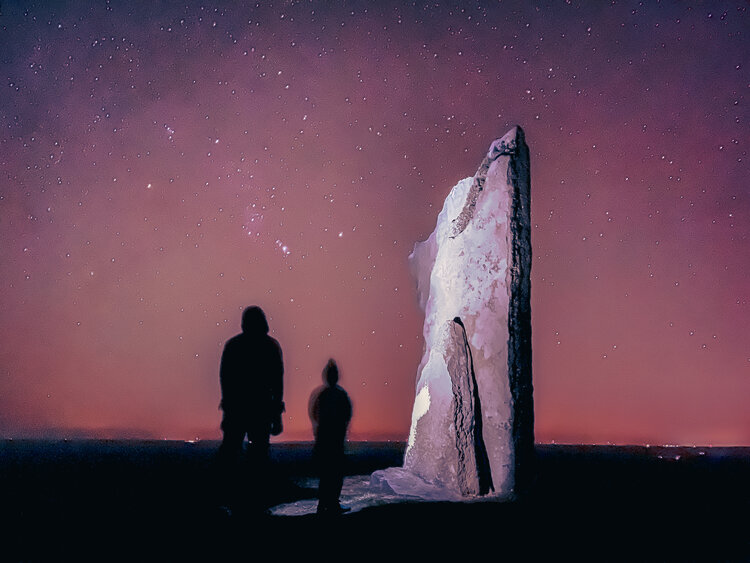

아래에 또 다른 예가 있습니다. Adobe Lightroom을 사용하여 두 파일을 모두 편집했지만 HEIC 파일을 보면 하늘에 상당한 노이즈 감소가 적용되어, 세부 사항을 복구하기가 어렵습니다. 오른쪽에있는 ProRAW 파일에서는 극적인 노이즈나 가공없이 이미지를 처리하고 은하수의 선명도를 유지할 수있었습니다.
Another example is below. I edited both files using Adobe Lightroom, but when I look at the HEIC file, there is significant noise reduction in the sky, making it difficult to recover the details. In the ProRAW file on the right, I was able to process the image and preserve the sharpness of the Milky Way without any dramatic noise or processing.


ProRAW를 통한 까다로운 조명 캡쳐
Apple은 (오늘날 최고의 프로 카메라 센서에 필적하는) ProRAW 형식을 사용하여 14 스탑의 다이나믹 레인지를 자랑합니다. 이러한 종류의 범위는 밝은 햇빛과 그림자가있는 장면에 매우 유용합니다. 하이라이트와 뭉개진 그림자 대신 디테일을 유지하는 데 도움이됩니다.
Apple boasts 14 stops of dynamic range using the ProRAW format (compared to today's best pro camera sensors). This kind of range is very useful for scenes with bright sunlight and shadows. It helps to preserve detail instead of highlights and crushed shadows
아래 화면 녹화에서 ProRAW에서 얻을 수 있는, 보다 세밀하게 조정된 컨트롤의 장점을 자세히 설명하고 있습니다.
The screen recording below details the benefits of the more fine-tuned controls you can get from ProRAW.
.
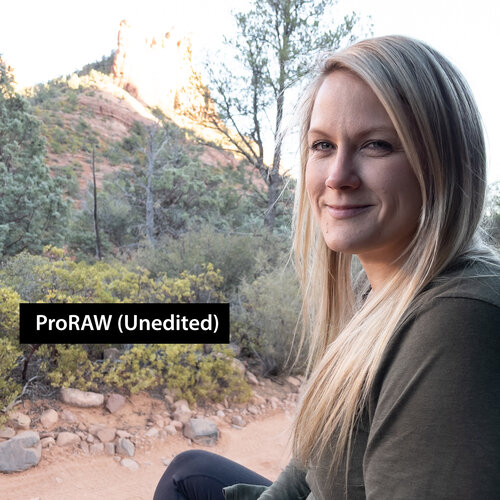

수 천가지 색상 표현
HEIC는 8 비트 색상으로 제한되어있어 256 가지의 빨강, 녹색 및 파랑 음영을 제공합니다.
12 비트는이 범위를 빨강, 녹색 및 파랑의 4,096 색상 표현으로 확장합니다.
이는 기본적으로 ProRAW가 JPEG 또는 HEIC와 같은 손실 형식보다 각 색상의 미묘한 음영을 훨씬 더 많이 렌더링 할 수 있음을 의미합니다.
HEIC is limited to 8-bit color, providing 256 shades of red, green and blue. 12 bits extend this range to 4,096 color representations of red, green and blue. This basically means that ProRAW can render far more subtle shades of each color than lossy formats like JPEG or HEIC.
아래 예를 살펴보고 특히 델리 고기의 분홍색 음영과 맛있는 네덜란드 치즈 웨지의 노란색 음영표시를 보면 됩니다.
Take a look at the examples below, especially the pink shades of deli meat and the yellow shades of delicious Dutch cheese wedges.
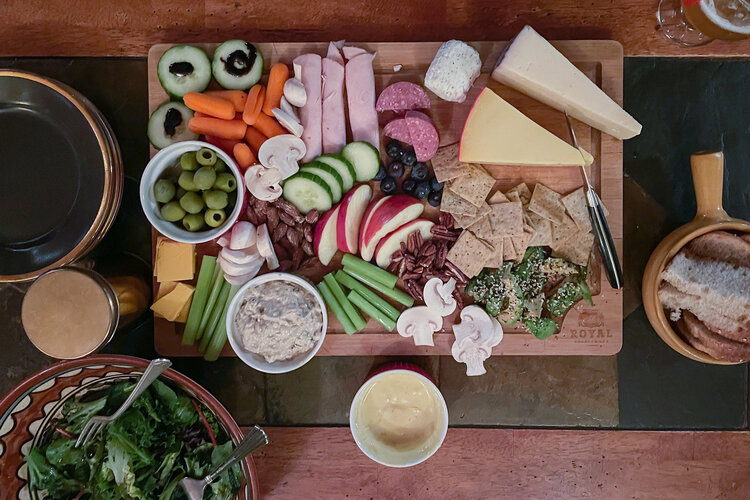

Apple의 Pro Display XDR에서 이러한 이미지를 나란히 보는 것은 색 농도의 극적인 차이를 보여 주며 인쇄에서도 훨씬 더 좋을 것이라고 생각합니다. (좋은 모니터를 사용하라는 애플의 깊은 뜻)
Viewing these images side-by-side on Apple's Pro Display XDR shows a dramatic difference in color depth and I think it will be much better in print too. (Apple's deep meaning to use a good monitor)
ProRAW 촬영, 수정 방법
ProRAW에서 캡처하려면 iPhone 12 Pro 또는 iPhone 12 Pro Max를 사용해야하며 iOS 14.3 이상으로 update 해야 합니다.
To capture from ProRAW, you must use an iPhone 12 Pro or iPhone 12 Pro Max and update to iOS 14.3 or later.
1. 설정> 카메라> 포맷으로 이동하여 Apple ProRAW를 켜십시오.
Go to Settings> Camera> Format and turn on Apple ProRAW
2. 기본 카메라 앱 열기
Open default camera app
3. 오른쪽 상단에있는 "RAW"를 누릅니다.
Tap "RAW" at the top right.
4. 이미지 촬영
Image shooting
5. iOS에서 Lightroom을 열어 내 카메라 롤에서 수동으로 사진을 가져옵니다 (자동 가져 오기를 사용하지 않음). 축소판의 오른쪽 상단 모서리에 DNG라는 명칭이 표시됩니다.
I open Lightroom on iOS and manually import photos from my camera roll (I don't use auto import). You will see the name DNG in the upper right corner of the thumbnail.
6. 원하는대로 편집 한 다음 Lightroom에서 공유합니다. (Mac에서 Lightroom을 열면이 DNG 파일도 표시됩니다.)
Edit it to your liking and then share it in Lightroom. (When I open Lightroom on Mac, I see this DNG file as well.)
ProRAW 촬영 팁
일반적인 알고리즘으로 모든 작업을 수행 할 수 없는 극단적인 시나리오에서 가장 중요한 부분을 확인할 수 있습니다.
You can see the most important part in extreme scenarios where you can't do everything with a common algorithm.
실내 혼합 조명 (차가움과 따뜻함),
Indoor mixed lighting (cool and warm),
극도로 낮은 조명 (예 : 별 사진),
Extremely low light (e.g. photos of stars),
초고 다이내믹 레인지 이미지 (백그라운드에 햇빛이 비치는 붉은 바위가있는 어두운 전경 등)
Ultra-high dynamic range image (dark foreground with red rocks lit by sunlight in the background, etc.)
위와 같은 촬영 시나리오를 생각하면 됩니다.
ProRAW에서 촬영은 아직 인물모드(Outfocus) 또는 파노라마 모드에서 가능하지 않습니다. 실제로 모든 ProRAW 파일에 일반 JPEG 파일이 있다고 보면 됩니다. 예를 들어 iMessage에서 편집되지 않은 ProRAW 파일을 공유하면 사전에 처리된 JPEG 파일이 공유됩니다. 그러나 동일한 파일을 사진으로 열고 편집을 클릭하면 실제 RAW 미리보기가 표시됩니다.
ProRAW를 켠 후에는 계속 켜져 있지 않습니다. 해당 세션 동안 계속 켜져 있으며 iPhone을 잠그고 몇 초 내에 다시 돌아 오더라도 ProRAW는 계속 켜져 있습니다. 그러나 몇 분 후에 ProRAW가 꺼집니다. (아이폰 카메라는 원래 2분 뒤 재진입하면 설정 초기화되는 로직이 있습니다.)
Shooting in ProRAW is not yet possible in portrait mode (Outfocus) or panorama mode. In fact, every ProRAW file is supposed to have a regular JPEG file. For example, sharing an unedited ProRAW file in iMessage will share the pre-processed JPEG file. However, if you open the same file as a photo and click Edit, you will see the actual RAW preview. After turning on the ProRAW, it does not stay on. It stays on for the duration of that session, and ProRAW stays on even if you lock your iPhone and come back within seconds. However, after a few minutes, ProRAW turns off. (The iPhone camera has a logic that resets the settings when re-entering after 2 minutes.)
ProRAW를 활용하는 앱과 툴
Halide (iOS): Halide 팀의 최신 버전 카메라 앱은 이미 ProRAW를 지원합니다. JPEG + ProRAW를 동시에 촬영하는 기능과 같은 강력한 추가 기능과 RAW 파일 크기를 관리 가능한 상태로 유지하기위한 비트 심도 감소와 같은 도구가 있습니다. iPhone에서 사진을 촬영하고 편집 할 때 최대한의 창의적인 제어를 원한다면 Halide 만 있으면 됩니다.
The latest version of the camera app from the Halide team already supports ProRAW. There are powerful additional features like the ability to shoot JPEG + ProRAW simultaneously, and tools like bit depth reduction to keep the RAW file size manageable. Halide is all you need for maximum creative control when taking and editing photos on your iPhone.
Lightroom (iOS + Mac):Adobe의 Lightroom은 Apple ProRAW 파일을 편집하고 구성하는 간단하고 빠른 방법입니다. 파일은 Creative Cloud에 저장되므로 Mac에서 빠르게 액세스하여 Pro Display XDR의 이미지를 더욱 미세 조정할 수 있습니다
Lightroom (iOS + Mac): Adobe's Lightroom is a simple and quick way to edit and organize Apple ProRAW files. Files are stored in Creative Cloud, so you can quickly access them on your Mac to further fine-tune images in Pro Display XDR.
RAW Power (iOS + Mac): Mac에서 Aperture가 마음에 드 셨다면 RAW Power를 좋아하실 것입니다. iCloud 사진 보관함과 동기화되며 사진을 편집하고 구성 할 수있는 수많은 도구를 제공합니다. RAW Power와 Halide는 잘 integrate되어 있다고 합니다.
RAW Power (iOS + Mac): If you like Aperture on your Mac, you will love RAW Power. It syncs with your iCloud Photo Library and offers tons of tools to edit and organize your photos. RAW Power and Halide are said to be well integrated.
ProRAW 촬영 시점
ProRAW 및 사용시기를 이해하는 것이 중요한데, ProRAW는 단순히 사진을 더 좋게 만들기 위해 켤 수있 는 마술 스위치가 아닙니다. 사실, ProRAW가 아닌 파일은 처음에는 ProRAW 파일보다 훨씬 좋아 보이므로 ProRAW 촬영은 추후 수정 과정에서 이미지를 미세 조정하는 데 시간을 할애하려는 경우에만 의미가 있습니다. 모든 종류의 극한 조건에서 촬영할 때 ProRAW를 켜는 것이 좋습니다 (매우 낮은 조명, 매우 밝은 하이라이트와 어두운 그림자가있는 매우 높은 동적 범위, 혼합 조명 온도 등). 또한 이미지를 확대하려는 경우 (화면 또는 인쇄물) ProRAW를 사용하십시오. 그리고 촬영 중일 때마다 ProRAW를 뒤집어보십시오. 뭔가 이상해 보입니다. 예를 들어 스마트 HDR이 훨씬 더 좋아졌지만 때때로 피부 톤이나 분홍색 구름을 이상한 방식으로 렌더링하는 방법을 모두 보았습니다.(실제로 HDR 자체가 합성기능이기 때문에 부자연스러운 톤이 자주 발생합니다.)
It's important to understand ProRAW and when to use it, ProRAW isn't just a magic switch you can turn on to make your photos better. In fact, non-ProRAW files initially look much better than ProRAW files, so shooting ProRAW only makes sense if you want to spend time fine-tuning the image in later retouching. We recommend turning on ProRAW when shooting in all kinds of extreme conditions (very low light, very high dynamic range with very bright highlights and dark shadows, mixed lighting temperatures, etc.). Also, if you want to enlarge the image (screen or print), use ProRAW. And whenever you're shooting, try flipping the ProRAW over. Something looks weird. For example, Smart HDR is much better, but I've seen all of it sometimes render skin tones or pink clouds in a strange way (in fact, it's a compositing feature, so unnatural tones often occur).
부자연 스럽거나 부정확 해 보이는 것을 발견하면 ProRAW로 전환하십시오. 이렇게하면 iPhone이 자체적으로 계산하는 부분이 줄어들고 가능한 한 많은 제어권이 제공됩니다.
결론적으로
12-bit 컬러, 14 스탑의 다이나믹 레인지, 훨씬 더 창의적인 제어 기능을 갖춘 Apple ProRAW는 iPhone을 통한 전문 이미징 분야에서 엄청나게 큰 도약이라고 합니다. (사실 삼성/LG 등의 업체가 기존에 RAW를 지원했지만)
대부분의 사용자를 위해 설계된 일반적인 계산 로직에 의존하는 대신 내 취향에 맞게 처리를 맞춤화 할 수 있다는 것을 알고 있기 때문에 거의 모든 조명 조건에서 강력한 사진을 캡처하기 위해 iPhone 12 Pro를 사용하는 것이 편안합니다.(처리 과정은 매우 귀찮고 복잡하겠지만)
이러한 각 업그레이드를 통해 iPhone은 가장 까다로운 창의적인 워크 플로우에서 전문가가 필요로 하는 것을 제공할 수있는 기기로 지속적으로 진화하고 있으며 iPhone 사진의 중심에서 ProRAW의 차세대 기능을 고려하는 것을 흥미롭게 보고 있습니다.
With 12-bit color, 14 stops of dynamic range, and even more creative control, the Apple ProRAW is a huge leap forward in professional imaging with iPhone. (In fact, companies such as Samsung/LG previously supported RAW) I am comfortable using the iPhone 12 Pro for capturing powerful photos in almost any lighting condition, as I know I can customize the processing to my liking instead of relying on the usual computational logic designed for most users. The process will be very cumbersome and complex, but) With each of these upgrades, the iPhone is constantly evolving into a device capable of delivering what the pros need in the most demanding creative workflows, and it's interesting to consider ProRAW's next-generation features at the heart of iPhone photography.
'IT-Tech > Apple' 카테고리의 다른 글
| [Apple-iPhone13]출시 관련 내용과 무광 블랙 옵션 (0) | 2021.08.24 |
|---|---|
| [Apple-Macbook]맥북프로 14/16인치 21년 11월 발매 예정 (0) | 2021.08.23 |
| [Apple-iPhone13]9월 셋째 주 발매 예정 (0) | 2021.08.18 |
| [iPhone13]아이폰13 Rumor - 이렇게 나온다 (0) | 2021.06.26 |
| [Apple]AirTags and new MacBook news (에어태그) (0) | 2021.01.05 |
| [Apple][Mobile review] iPhone 12 iPhone 12 Pro real review and official unboxing, camera review (iPhone12, iPhone12Pro) (0) | 2020.10.23 |
| [Apple][Mobile review] iPhone 12 iPhone 12 Pro real review and official unboxing, design, MagSafe-MaxSafe (iPhone12, iPhone12Pro) (0) | 2020.10.23 |
| [Apple][MobileReview]iPhone12 real unboxing (0) | 2020.10.20 |
